
Surprising Ways to Hang Curtains in a Rental Property

There are many different ways to hang curtains in a rental property! I have been renting since I was 17 (with a brief stint back home in the middle, thanks mum!) and one thing that ALWAYS bugs me is window coverings. I loathe the beige, crappy colours that come with rental properties and/or the lack of privacy. Plus, with many landlords forbidding you to put a hole in the wall requires a creative approach to adding a bit of extra privacy (and style!) to your home.
To hang and style curtains in a rental property, you can use 3M hardware stickers, a tension rod, or use zip ties to attach to already installed blinds. Alternatively, if you have painted brick, drill holes then reseal and paint before you move out. In this article, I go beyond just using 3M stickers on the wall as there are several other options.
If you’re anything like me, you like to turn your house into a home and the biggest thing for me is always LIGHT. Daylight, sunlight, mood light, lamplight, fairy lights. You name it. I’m all for it.
I DREAM of the day of having my own place a drilling a hole in the wall whenever I want.
Until then, putting up window coverings is something I see as essential when I move into a rental property (assuming there are no nice window furnishings there already!). I don’t like people being able to see in and honestly, I like the option to run out for a towel from the bathroom without the risk of giving the neighbours an eyeful!
Over the years, I have lived in a wide range of properties, but the main thing is that hubby and I now are deliberately choosing to live in lower-cost rentals to save money for our own home deposit. This means we are typically living in older rental properties and to be honest some haven’t been updated since the 1970s. Yes, cue the brown kitchen, beige floors and yellow walls. So I am all about the cost-effective, DIY solution that can transform the ugly into something that makes me happy. And it needs to make you happy as homes are so much more than four walls!
Curtains and window coverings are always one of the first tasks I complete once we move in. However, buying curtains and rods can add up quite quickly so I have put together what I have learned from installing curtains in the rental properties I have lived in so far.
1-
How to hang curtains with no drill, no 3M hooks, no rod, no bracket - Just fabric curtains with velcro

(photo image credit: One Kings Lane)
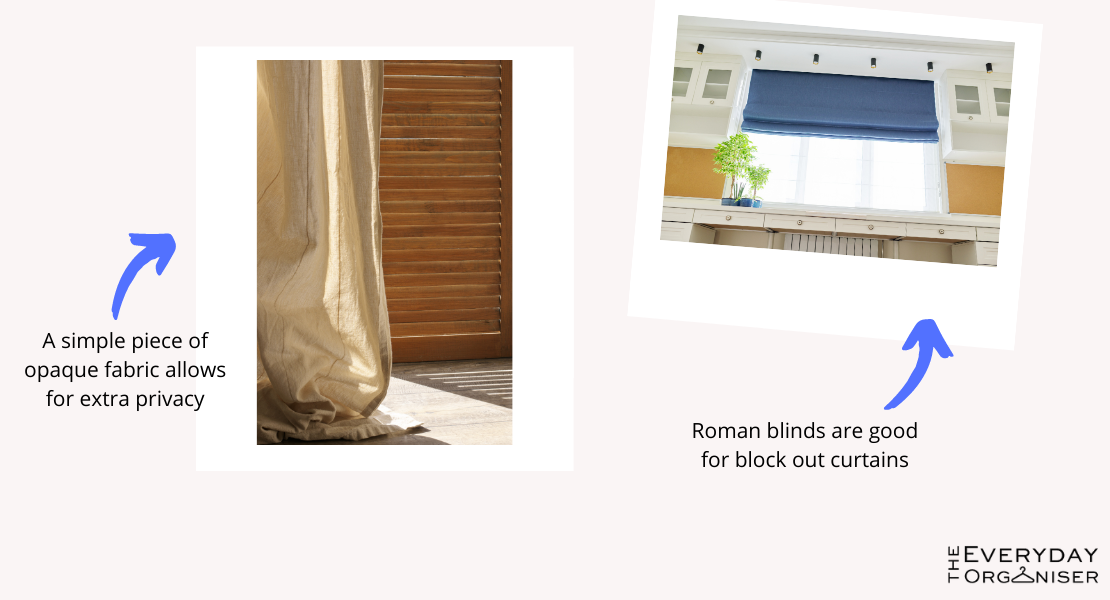
This is super simple and great for lightweight, blockout fabrics when you need a dark room (great for babies and young kids!). Buy a strip of velcro (or join several together) and stick it to the actual window frame, or if you prefer, just above the window. Adhere the opposite side of the velcro to a large piece or panel of fabric. Sandwich the velcro together and voila! Darkness!
For the fabric, you can buy pre-made curtain panels or for a more creative (and potentially cheaper option) you can buy a large panel of fabric from your haberdashery store and sew the edges yourself. For blockout fabric, you can get creative with nylon fabrics – think wind jacket, picnic mat, baby change mat materials. For extra strength when attaching the velcro to the fabric, I would also stitch the velcro to the fabric as the glue on velcro can be a bit iffy with repeated use.
You can either rip the fabric off the velcro during the day if needed, or slit a hole at the top of the fabric at either end of the “curtain”, pop a ribbon/string through the slit and “roll” up the fabric panel and tie to secure.
2. How to hang curtains from the ceiling without screws
Okay, so I did this recently and it was AMAZING. Hanging curtains FROM THE CEILING, (yes you read it right) is PERFECT for when you can’t hang curtains from the walls. You may want to do this for several reasons; crumbly, exposed brick walls where no 3M sticker is going to stay, the landlord won’t approve screws for curtain rods, you don’t have a drill, you can’t adhere 3M stickers straight to the window frame itself, tension rods aren’t practical, or you have a tight or oddly shaped space. I also did this in one rental for a privacy screen as we had a loft-style bedroom and it was pretty amazing. For this installation you will probably need a ladder/table, but it’s worth the hassle of setup if you have no other option. My only caution is that you don’t want to heavily pull on the curtains, either by accident or by putting up heavy curtains, as this may rip the 3M or Command sticker from the ceiling and then you have to repaint (not great, but easily done if needed as outlined below).
To set up, you will need single Broom or Mop hooks to do this, like this one from bunnings.com.au or this one from the containerstore.com. To find this specific hook, I hunted around our local hardware spots like Bunnings, Kmart, and Dollar Stores. It will most likely be called a Broom Hook or Mop Hook, but sometimes you just need to go in person to see what they have in stock, particularly for Dollar Stores. You want one that has an actual firm hook or loop and a flat base with stickers. Avoid the soft rubber, flex designs as your curtain rod will simply pop out of these. Here’s an example of an “open” broom hook with 3M stickers. The larger the sticker base, the better!
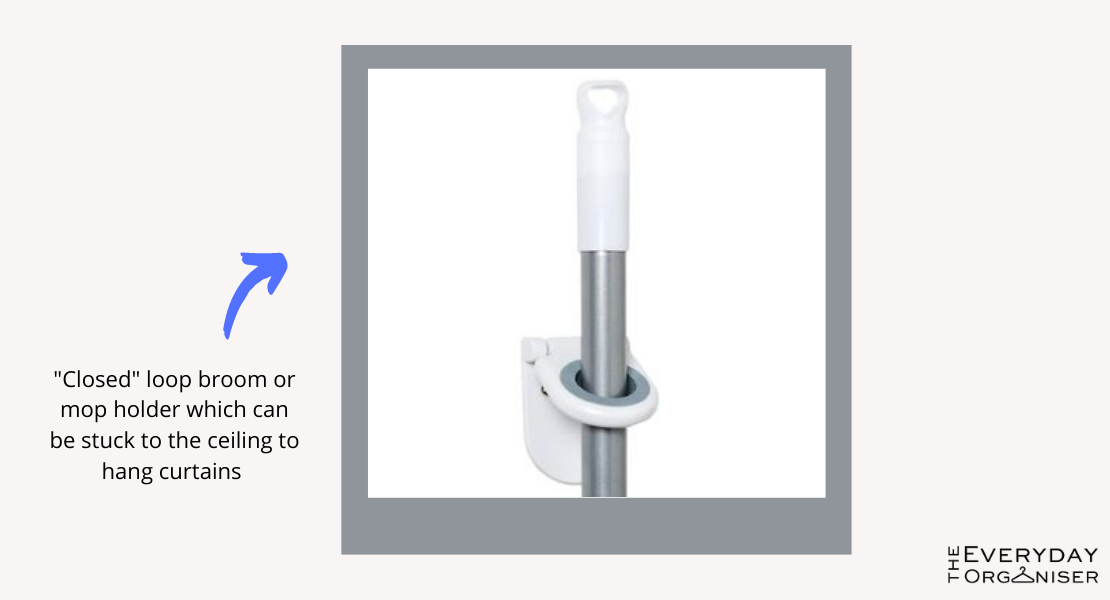

(Image: The Container Store and Bunnings Hardware)
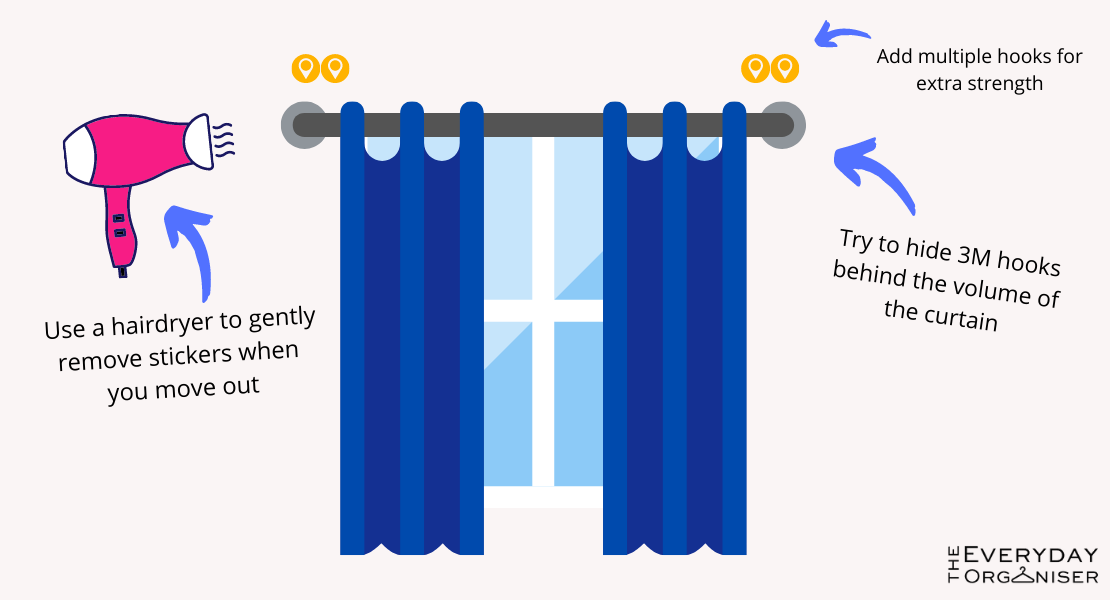
To install your curtains, read the weight of the Broom or Mop Hook and buy multiples to accommodate the weight of your curtains, rod, and rod decorative ends. Evenly space the Broom or Mop hooks out along the ceiling, making sure they are as close as possible to the wall to mimic an actual curtain rod installation. For 3M and Command hooks, I always try to leave them for a few days before putting any weight on them so they stick firm. It takes some patience, but it’s worth it!
If you have a “closed loop” hook, you can attach to the ceiling in two ways. Firstly, you can remove the “hook” from the base and thread it onto the curtain rod with the curtain fabric. I use sticky-tape to put the ‘hook’ into place to align with the base of the hook stuck to the ceiling and then (with the help of a friend) “snap” the hooks into the base. For “open loop” hooks you can thread the hooks directly onto the curtain rod with the curtain fabric and then lift the whole thing up and stick it to the ceiling. For both methods, I found it helpful to use sticky-tape to keep the broom/mop holders in place on the curtain rod. You don’t see the tape when the curtains are assembled.
To remove the curtain rod setup when you move out, you will need an electrical extension cord and a hairdryer. Heat the sticker so it melts off. When you are up there, if there is any sticky residue, use a bit of Eucalyptus Oil (this stuff if the best!) with a microfibre cloth or just a tea towel to remove any stickiness.
Now if you are like me and have zero patience when you are moving and accidentally rip the 3M or command sticker off and the paint comes with it (true story), there’s hope. If you can get a sample of the paint chip (even a teeny, tiny one will do). Take it to your local hardware store and match against the paint wall. Even if it is basic white paint, get a sample anyway as older paints can change colour over time. Get a tiny sample pot from your hardware store of the same colour or the closest match if possible. Make sure it is “ceiling paint” as this has NO gloss. Ceiling paint is incredibly flat, meaning you rarely see bumps, so even if a bit of paint has come off, you probably won’t see it at all when you touch up. Touch up with a decent brush or roller, not that piddly paintbrush from your $2 art kit. Keep in mind you may need more than one coat, so keep the ladder setup until it dries as you may need to touch up a second time (paint becomes darker as it dries).
3-
Hanging curtains by yourself without everything sliding off
Who needs a partner when you can find a way by yourself? I love figuring things out for myself so I can just get it DONE.
The best way to hang curtains by yourself is to use an extendable rod. However, if you have a regular-sized window, this also works.
Thread or slide the curtain fabric onto the rod extending it as far as you can manage, without the rod bending too far. I then tie a large piece of fabric (this can even be a lightweight maxi dress) in a bow or loose tie so that the curtains don’t slip off the rod as I am waving it around trying to secure it in the curtain rod holder or hook. You want to be able to hold the curtains in place, but also be able to remove the bow/fabric once you have the curtain rod in place. For extra (more permanent) security, you can also zip tie the end of the curtain to the end of the rod so it always stays in place. I find this great in stopping the ends falling off when you don’t have a large curtain rod end/decorative piece. And I can’t be bothered getting the ladder out to fix when that end pesky curtain eleyet falls off from opening and closing curtains each day.
Once you have your curtains on the rod and temporarily secured with a large piece of fabric/bow/maxi dress, you can now put the curtain rod in the brackets. I stand at the place where the curtain rod extends from the other, which is usually in the middle, and focus on securing one end of the curtain rod. As the curtains themselves are secured in place with the fabric bow, I am not worried about the whole curtain sliding off and throwing me or the rod off balance. Once the first end of the rod is secured in the hook/holder, I then extended the rod out to its full length and secure the other end (with an extra middle hook if the curtain rod is quite long).
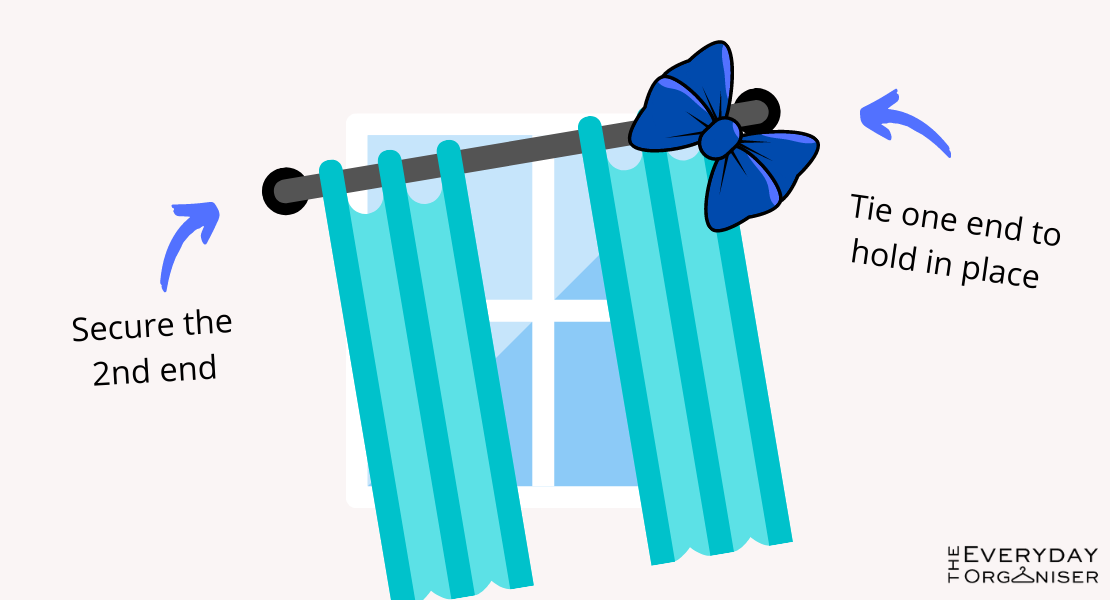
Once the curtain rod is 100% secured at both ends, I gently tug down the fabric bow which was keeping the curtain from slipping off the ends and spread the curtains out to their correct positions. Voila! I also like to put a wrap of sticky tape around where the curtain rod extends from so it stays in place. When taking the curtains down, I just gently twist the rod and the tape frees up and is easy to remove.
4-
Hanging curtains on brick walls with screws
I am starting with this one as this is what we currently have in our rental. Here’s what we have discovered: it’s really easy to drill holes with just a basic drill on painted brick and touch up with paint.
We have a basic, good quality drill from our local hardware store, Bunnings. If you don’t have a drill and are planning to rent for the next 5-10 years I cannot recommend enough the value of investing in a drill as they are so incredibly handy for renters with all the fixes you need to do in rental properties. It will also be something you will also use when you buy your own home.
To drill the holes in brick, you will need screws and plastic anchors (you can’t put a naked screw into the wall). Most curtain rod screws are fairly small. Start by drilling a small hole (at least 50% of the size of the screw) and then re-drill that same hole to a larger hole to fit the screws for the curtain rods. Have the small plastic screw “anchor” handy so you can easily see how much further you need to drill into the wall. Pop the plastic anchor in by gently tapping it in with a hammer or mallet (or whatever works for you!). Put the curtain rod holder/bracket in place and “hand” screw, with a basic screwdriver, the metal screw through the curtain bracket and into the plastic anchor.

Tip: buy some quality screws from your hardware store instead of using the cheap screws that come with the curtain brackets as this will prevent you “stripping” the screws.
Note, drilling holes into the brick does take a bit of time! Patience is key. As you drill the dust will build up, so make sure you are removing the dust as you go to make the process faster.
When we move out, we will simply purchase a caulking agent as recommended by our hardware store, for painted brick walls to be painted over. Or, we will be nice and leave it for the next tenant as the holes are quite small and barely noticeable. Simple right?
Hot tip: buy the smallest sample pot of paint or colour caulking agent to match your rental walls from your hardware store so you can easily touch up and marks over time.
5-
How to hang curtains on brick walls with no screws
For exposed brick walls, I think this is the trickiest combination when it comes to hanging curtains. The texture and nature of brick to crumble slightly means that 3M or Command stickers most likely won’t work. In addition, you are most likely living in a double brick home which can equal temperature fluctuations and that the stickers may slide off the walls in the heat or with condensation, especially if your old rental is poorly insulated. I am going to be honest, I have not found a solid solution for hanging curtains on brick walls without screws. This is because of safety. You don’t want to accidentally pull down the curtain and the curtain rod hit you or damage something nearby.
The only way 3M or command hooks could work is if you stuck them to the window frame directly. Now, this will 100% change the aesthetic, but it could be better than nothing. Or, you could hang the curtains from the ceiling.

For nurseries and rooms where you need blockout curtains, you could put a strip of velcro across the actual window frame to adhere the fabric. Other options, particularly for nurseries, include simply putting tin foil or a picnic mat on the window to block out all light.
I would take my chances putting up the curtains with screws and/or asking your property agent if you can install curtain hooks. In Australia, we are now (YAY!) allowed to drill into walls as long as we cause no damage/return to the original state when we vacate.
If the bricks are painted, you may have some luck with 3M or Command hooks as the surface of the brick is much smoother than unpainted brick. I would recommend you adhere the hooks and leave them for a few days before installing the curtains to ensure maximum grab for the sticker. If you find that the stickers just keep falling down on your painted brick walls, I would look at using screws or hanging the curtain rods from the ceiling. You can try different brands of sticker hooks or simply add more to spread the load, but if it just isn’t working, take a different approach.
6-
How to hang curtains on plastered walls without screws
So I’m not including “hanging curtains on plastered walls by drilling in screws” here as that is the renter’s dream.
For plastered walls where you can’t drill a hole and put screws in to hang curtain rods, this is where 3M or command hooks are the best. Ensure that you read the maximum weight-bearing of the stickers and always add more than you think. To hide the large plastic hooks, I always make sure the curtains cover them by placing them a little inside of where the rod ends. If you can’t hang them from the walls, you could try hanging them from the ceiling as I show above.
To remove the stickers when you move out, pop the hairdryer heat on the sticker (you will most likely need an electrical extension cord to reach) and heat the sticker so it effectively melts the glue. If there is any sticky residue, clean with a spot of Eucalyptus Oil and rub until the residue is removed. A rough paper towel or microfiber cloth will make this job easy.
If you accidentally remove some paint, take a tiny chip of it to your local hardware store and grab the smallest sample pot which is closest in colour. Note if your walls have a gloss to them (most walls have a semi-gloss) and touch up the paint. Take the paint pot with you as this may come in handy for future rentals!
7-
How to put curtains over vertical blinds
Ah, vertical blinds. I have a love-hate relationship with them. Great for partial light and yet look absolutely ugly and flap around in the breeze. To hang curtains over blinds, specifically where the vertical blind tracks stick out and you can’t simply attach normal curtain rod to the wall to cover up, I have used extremely long curtain rod brackets (and even bent some into shape) and then zip-tied them to the track. NOW, I have always made sure that I use incredibly lightweight curtain fabric and these curtains are not designed to be open and closed as this will pull on the vertical blind tracks. You 100% don’t want to damage the tracks as this will be incredibly expensive! I have used sheer curtains from IKEA all the way across OR just used opaque ones at the end to cover the vertical blinds when they are open.

8-
How to use tension rods when hanging curtains
I am not the biggest fan of tension rods for curtains as I find they fall down and can damage walls in your rental property. However, they are great for awkward and tight spaces and if you can’t use or don’t have a drill. To use tension curtain rods, choose a lightweight fabric and a lightweight curtain rod to avoid additional weight which may cause the rod to be displaced. Depending on the length, you can run the rod from either end of the wall and position the curtain over the window area to give the illusion of a regular curtain hanging. I think this category of curtain rods will improve constantly over time so check out local homeware (IKEA usually has some great options) and hardware stores for options they may have. As always, keep the rod and fabric light so you’re not constantly reassembling!

9-
How to put curtains over plantation shutters
Plantation shutters are great to block out light at night, but if you are wanting to add curtains for added privacy during the day or blockout curtains for extra darkness, this can be done.
Roman blinds and regular curtains can be put over plantation shutters, however you do want to ensure the shutters are closed if you are closing curtains to avoid the fabric catching.
If you can drill brackets into the wall, use long or extendable curtain rod bracket holders that stick out from the wall a little further than regular brackets. This means you can open the individual shutters without them catching on the curtain fabric.
For a no-drill approach, I would attach 3M or Command hooks to the frame directly. It won’t look perfect, but it will give you extra privacy – particularly for sheer curtains stretching all the way across the window.
10-
What to do with your curtains when you move rental properties
Ah, moving. The inevitable with renting. When you are inspecting your new place, take note of what the window covering situation is. Will your current curtains and window covering suit the new place? If not or if the new place already has fabulous window coverings installed, make a decision to either clean the curtains and pack them away or sell them. From experience, I now prefer to hold onto my curtains as I have re-used them over the years, even if it’s not in consecutive rental properties. So many things can change, like owners wanting to sell, or issues arising forcing you to move early, so holding onto all of that expensive fabric is usually a good option!
If you are packing them away, make sure you do give them a good wash and dry thoroughly before popping them into their box. Avoid storing them in plastic as this can harbour moisture and cause damage over time.